December 20, 2018
Part 3 — Mutating data in a React Native app with Apollo client


Thanks for checking-in to part three of my blog series Getting Started with GraphQL and React Native. Now that we have all the configuration out of the way, I’ll walk you through how to create and update data using GraphQL and what’s called a Mutation.
Create a form
In most apps where you can create and update data, you do so via a form. For the purposes of this example, we’ll create a simple form that will ask the user for a dog name and type.
Create a simple layout and add some <TextInput> components, similar to the following example:
<View><Text style={styles.welcome}>Dogs data:</Text><TextInputstyle={styles.input}onChangeText={(text) => this.setState({ name: text })}value={this.state.name}placeholder="name/><TextInputstyle={styles.input}onChangeText={text => this.setState({ type: text })}value={this.state.type}placeholder="type/><Button onPress={() => {}} title="Add dog" /></View>
Execute a mutation operation
Now we need to create a mutation for adding a dog. You don’t need to create anything extra on the server-side. Prisma already offers you mutations to create data based on the types in your GraphQL schema. You can test the mutation by opening the Prisma endpoint in your browser:
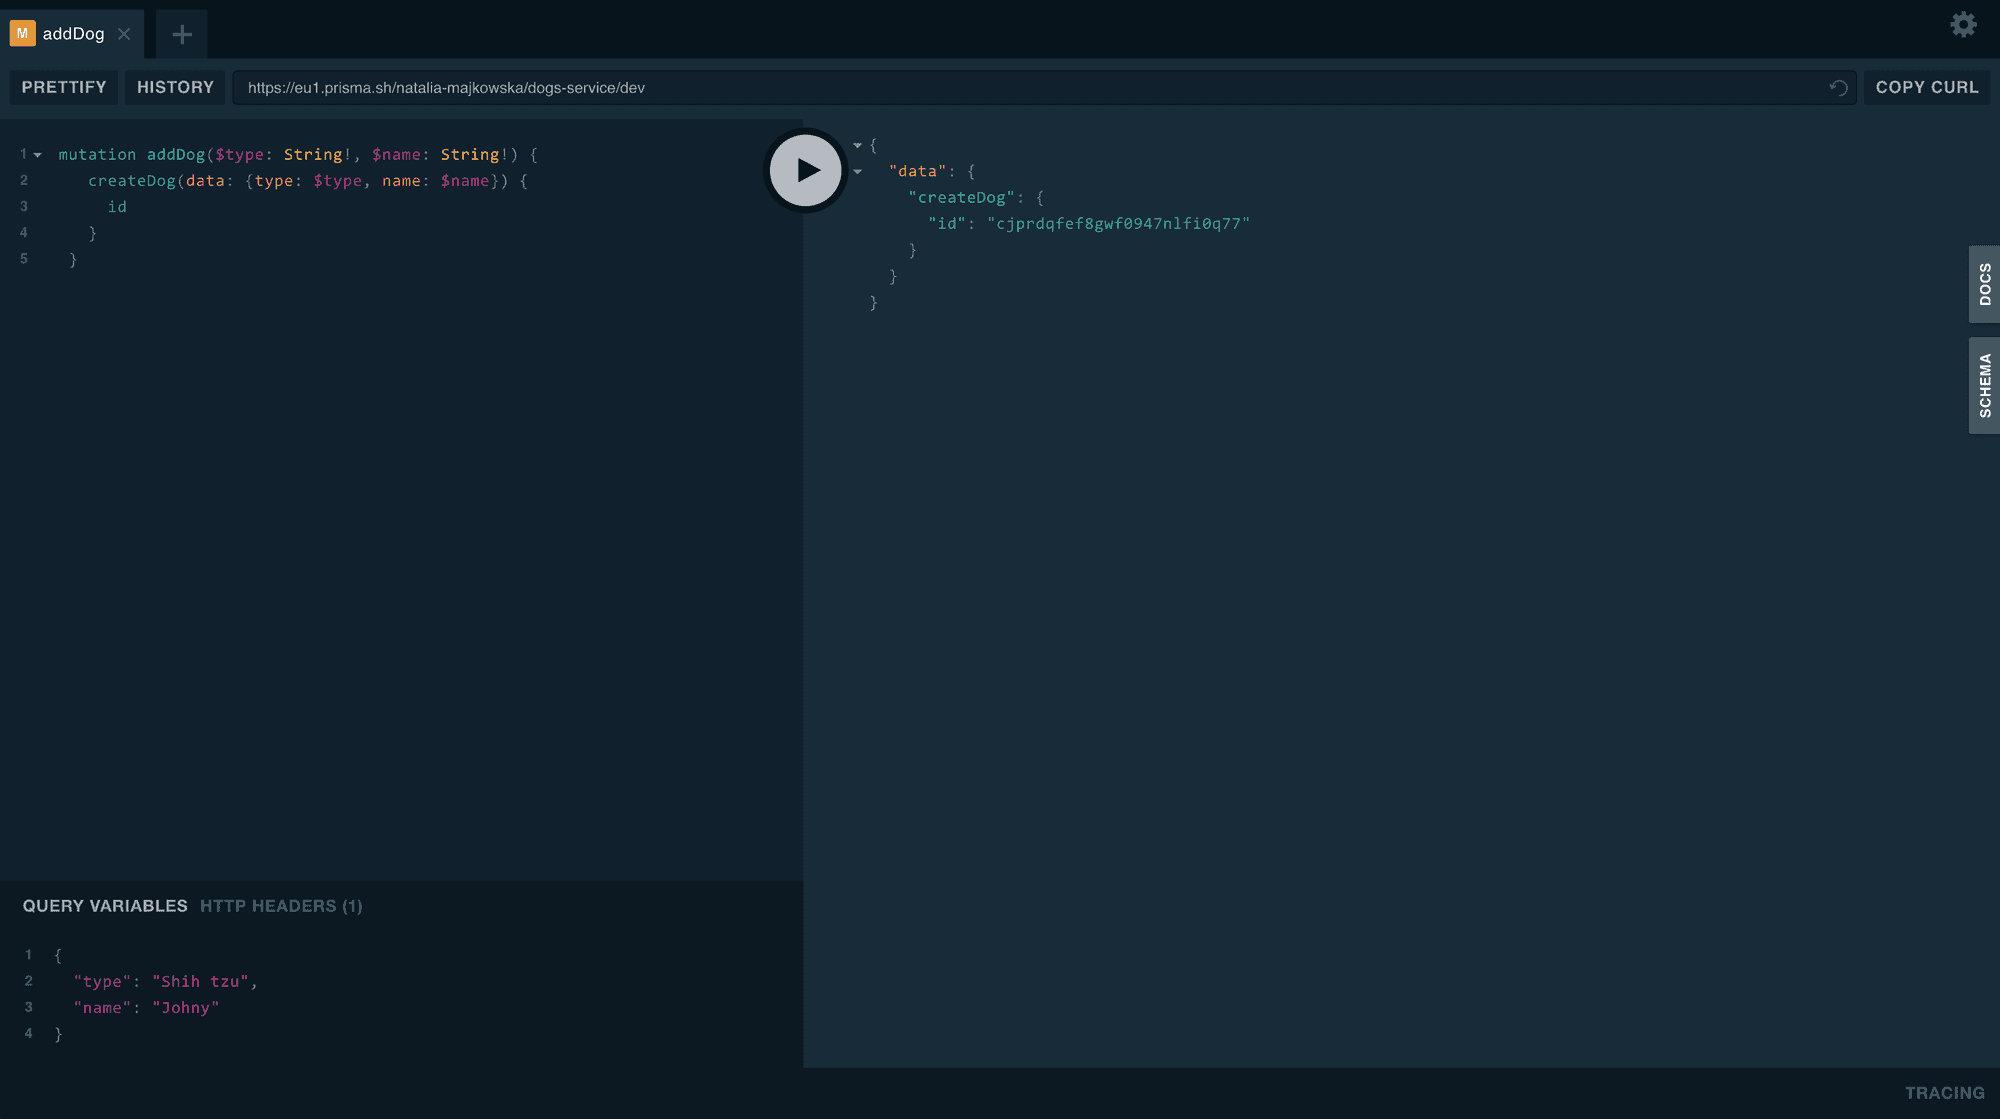
In my example, I used the createDog mutation and named the operation addDog. When executing a mutation, more times than not you’ll want to send along some user data. This is done through variables.
To verify the operation is executed successfully, copy the same mutation from above and click the Play button. If successful, you’ll notice the mutation returns an id. That’s because we’ve specified we want the id of the new dog returned in our mutation.
Let’s add the addDog mutation to our React Native app:
const addDog = gql`mutation addDog($type: String!, $name: String!) {createDog(data: { type: $type, name: $name }) {id}}`
Okay, we also need to import Mutation from the react-apollo package.
import { ApolloProvider, graphql, Mutation } from 'react-apollo'
To execute a mutation operation in a React Native app, we use the Mutation component. It takes a mutation prop, which is where we’ll assign our addDog mutation. The Mutation component uses the render prop pattern in React. React will call the render prop function and provide you with a mutate function and an object containing data about the mutation’s result. To use the Mutation component, we wrap our existing layout in it:
render() {return (<ApolloProvider client={client}><View style={styles.container}><Mutation mutation={addDog} refetchQueries={[{ query: dogQuery }]}>{(addDogMutation, { data }) => (<View><Text style={styles.welcome}>Dogs data:</Text><TextInputstyle={styles.input}onChangeText={text => this.setState({ name: text })}value={this.state.name}placeholder="name"/><TextInputstyle={styles.input}onChangeText={text => this.setState({ type: text })}value={this.state.type}placeholder="type"/><ButtononPress={() => {addDogMutation({variables: {type: this.state.type,name: this.state.name}}).then(res => res).catch(err => <Text>{err}</Text>);this.setState({ type: '', name: '' });}}title="Add dog"/></View>)}</Mutation><Text style={styles.welcome}>My dogs:</Text><DogComponent /></View></ApolloProvider>);}
We want to ensure our list of dogs is updated automatically after each successful mutation. For that to happy we can pass a refetchQueries prop to the Mutation component. It takes an array of objects, where you’d specify the queries you want to re-execute.
<Mutation mutation={addDog} refetchQueries={[{ query: dogQuery }]}>
Look at the button’s onPress method, we call the addDogMutation with variables, very similar to how it was done in the in the playground.
It’s very useful to first check your mutations are working correctly in the playground because you can save a lot of time. Especially if you have a bug! Trust me, I know… 😂
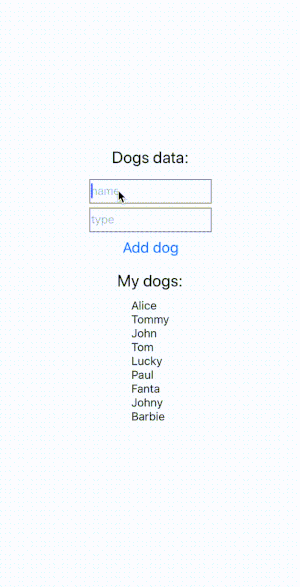
Here is the final result of our app, where we can add a new dog:
What’s next
I hope this article has encouraged you to learn more about GraphQL mutations and how they work in Apollo Client. But, our adventure with GraphQL, Apollo, and Prisma doesn’t stop here. In the next article, we’ll focus on Implementing Authentication and integrating it with Apollo Client. If you like our tutorials, remember to follow us on Medium and check out our next post. 😃
Source Code:
https://github.com/brains-and-beards/react-native-graphql-app
Want more?
If you liked this post, why don't you subscribe for more content? If you're as old-school as we are, you can just grab the RSS feed of this blog. Or enroll to the course described below!
Alternatively, if audio's more your thing why don't you subscribe to our podcast! We're still figuring out what it's going to be, but already quite a few episodes are waiting for you to check them out.


WRITTEN BY


More Brains and Beards stories


If you're a bit of a technical nerd (like us!) you can keep on reading. This site has been built in React, using GatsbyJS. The data layer is managed through GraphQL. The whole thing is hosted using Netlify. All of those products are great and we're so happy to be able to use them 💯❤️🚀